In our Sofa- Welcome at Marilyn’s Place

0

Posted by Marilyn Rivera

23 August, 2014 -

Write a comment

Marilyn-Rivera

Hello Maja friends!!  Today is my turn to show you my little paradise that is how I call my scrapbook room. I moved to USA eight months ago and I took the smallest room in our apartment that is near to a big tree full of beautiful birds like cardinals and many other species that are singing all day.  For that reason my desk is near to the window and I can see and listen all these beautiful creatures meanwhile I was creating my pages, it is like a paradise for me…priceless!!  My room in not a gorgeous or fancy place, it is only 10 x 10 room that is very practical and functional for me. Let’s get started with the tour…

DSC_6910
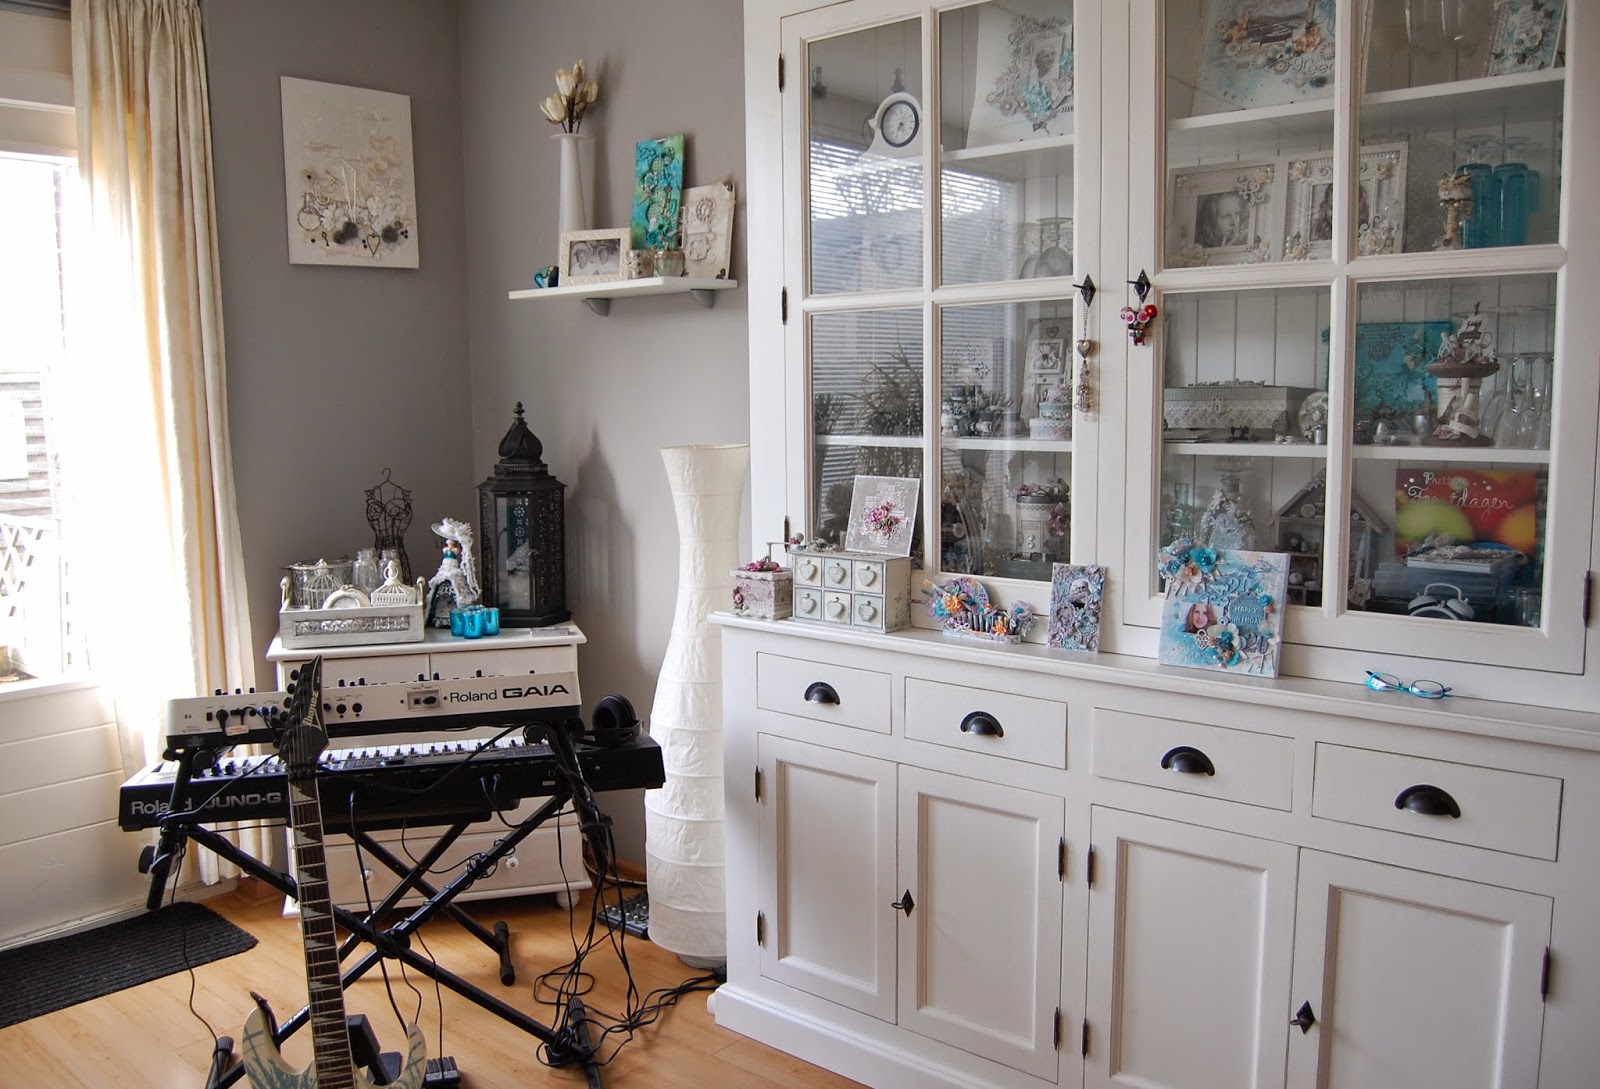
Here’s how it looks from the door. To the left you see my work area (desk), the double white doors in the back is the closet.  In the right side you see my sewing machine and “Juanita” that is how I called my dress form, lol.

DSC_6914Up front you’ll see my complete work area, in the left you see my photo printer and under it a drawer where I keep my cardstocks and papers. I will tell you a secret…how much do you think I paid for this desk…?  I paid twenty five dollars for it in a Goodwill Stores…awesome! I left most of my scrapbooking furniture in Puerto Rico and I only brought a few thing. I had to buy almost everything again so I was looking for good bargains. So I was happy with this buy. In the bottom right is my baby boy “Sponky” he is a 14 year old dog..always beside me.

DSC_6915In these small drawers I organize my Liquid Pearls, Stickers, gelatos, Chalk inks, etc..

DSC_6917-copyIn the top of the desk, I have plastic jars with flowers, ribbon, laces, pearls. I also have my works and some gifts like the beautiful cards that Ingrid Gooyer and Maritza Valdez sent me from my Birthday. The things I used the most you see them on the shelf.

DSC_6918Behind the small door you will find my stencils, alphas, mesh tape,doily papers and stamps.

DSC_6920I bought this rolling organizer at Michael’s and it’s perfect for my paints, mediums and mists.

DSC_6922My hubby put hooks under the desk and I can hang my heat tool and glue in this way, which is very practical.

DSC_6930When you open the double doors that is what you find.  I design for different companies and here is where I keep all their products in plastic organizers and in white boxes. Each company has their own plastic box and I organizer by collection, embellishments, etc. I also keep here my Cricut machine and Cutttlebug.

DSC_6934This is the view from the window.  I bought this industrial sewing machine before I started to study Fashion Designer, twenty seven years ago.  The big furniture was a gift from my mom and I brought it from Puerto Rico.

DSC_6935This is the place where I keep my laces, sewing notions, stamps, different tools.

DSC_6937The drawers…one for my threads and the other for my punches.  I keep my laces in plastic boxes.

DSC_6939My die cuts, embossing folders are in this plastic containers from Dollar Tree.

DSC_6927

In this corner you will find flowers, flowers and more flowers…

DSC_6928These baskets are full only of Prima flowers and embellishments.

DSC_6929One drawer is for my buttons, other for more flowers, other for my pearls….

DSC_6940Stamps and dies

DSC_6941Metals, buttons and chipboard.   You see I have everything organized without spent a fortune.  I hope you enjoyed my scrapbook room tour…Thank you so much for your visit!!

Marilyn-sign (1)


In our sofa – Welcome at Ingrid’s place

0

Posted by Ingrid Gooyer

9 August, 2014 -

Write a comment

Ingrid-Gooyer

Hi there Maja friends!
Today it’s my turn to share my little scrap place.
And little it is!! LOL
I’m not having the luxury of having my own scrap room and always make my projects on my dinner table. Not having a scrap room means you’ll find my stash and products all over the place! And I mean everywhere!! 🙂
My two girls are still living with us but it will not be long before they will leave the nest.
Always kidding them by asking them when they will leave so that I can redecorate their rooms into a scraproom. Shhh(don’t tell)…the truth is I love having them around me!

Here are some photo’s of my house, so sit back and don’t mind all the mess!!I remember buying this white cabinet and wondering how I was ever going to fill this one and look at it now……need I say more? 🙂
Packed with projects just for me, but also a lot of projects waiting for a new home.
Love to give them as gifts to my family and friends!
The keyboard and the guitar is from hubby.

Can you guess what’s my favorite color? 🙂
This is the other side of my living room with a view of my small backyard.


Painted my stairway some years ago. All the colors still makes me very happy!

A rare view of one side of my living room…..empty dinner table!
Darling daughter finally has a chance to actually sit at that table!
I always try to clean up the table after every project.
Doesn’t always works that way but I kinda like all the goodies at my display!

Boxes, boxes and boxes everywhere!

This is what my table looks like after another Maja project!
Now you see why I desperate need a scraproom, don’t you? LOL

I have to admit I have a crazy obsession to find it difficult to throw anything away from all of those papers. Every little piece I have to keep and I even save all the leftovers from my punched flowers!
Do you think I need some help? 🙂

All my painting is done in my kitchen.
It’s very small but somehow I find a way to work between all the cups and plates!
I’m driving my girls crazy when they need the space for making their lunch or even to make a cup of tea! No worry girls, we will find an empty place! 🙂

I told you it would be messy! LOL

But he….I DO clean!!
Ready for another project! 🙂

Hope you all liked this post and who knows, maybe soon I will be lucky to have my own space! 🙂
Enjoy your day!
Ingrid xxx

In our sofa…Welcome to Camilla’s place

2

Posted by Camilla Ekman

19 July, 2014 -

Write a comment

Hi everyone! Camilla here. Today it is my turn to show you where I create my scrapbooking projects.

Camilla-EkmanAs you can see I only have half a room as my scrap space so I have to keep it organized. Thankfully I live in Sweden, the homeland of IKEA. LOL

Rum1Here is the desk I normally use when I scrapbook. Sometimes I move into the kitchen or the living room though, especially if I scrap for a whole day and want to watch television at the same time.

Rum2 In this area I have all my dies. The Silhouette is sadly very rarely used.

Rum3 And on these shelves I have my mists.

Rum4 I have some of my papers standing in the book shelf. The older papers I don’t use anymore I have put away into a closet.

Rum5 Above the desk I have shelves with boxes. The boxes contains older flowers, which I have sorted by colours.

Rum6 And my punches and border punches are in plastic containers like these.

Rum7 As you might have noticed I like plastic containers since I can easily see what’s inside. Here I have newer Prima flowers still in their packages and also my laces from Tresors de Luxe and chipboards from Blue Fern Studios.

Rum8 This drawer is also from IKEA and contains different stuff. Rum9 On my desk I have these containers with different mixed media products and stamps I often use.

Rum10Finally… Here’s what my desk looked like the other night when I sat down to work on a Maja Design project. You will see the result if you head on over here tomorrow morning…

Rum11Camilla-sign

In Our Sofa …. Welcome to Nancy’s Creative Space

5

Posted by Nancy Hanttula

14 June, 2014 -

Write a comment

Hello Maja Design fans and friends! Nancy Hanttula here, and today is my turn to share a glimpse into my creative space.

Door Sign 2

Above is a vinyl chalkboard sign that I have hanging on my creative space door. ( A disclaimer of sorts. )  Because, I won’t lie, my space is seldom that tidy.  I do try to clean up after projects….but there always seems to be a bit of chaos going on.  But, with that said, I did clean up knowing that I was inviting guests over. 🙂

So, come on in….it’s the door to the right……

door to the right

I feel so blessed to have a room to call all my own.  Before moving into our new house, I was a dining room table scrapper.  I had all my supplies “neatly” organized alongside the wall (yes, the dining room wall) …. well, at least until I was in the middle of a project, and then well, things weren’t so neat.  And as most scrappers realize way too late, supplies start to amass in quantities you just do not plan for.

So, let’s open up my door…

1 Inside the DoorFortunately, I had not been scrapping too long before we moved to a bigger house (frankly, with our 2nd child, we were busting at the seams), and I was fortunate enough to get to have one of the extra bedrooms all to myself to turn into my very own creative paradise.

AND that is exactly what I did.

1 paints inks glues

AND before I even organized my clothes closet, I set to work on getting my creative space up and running. 🙂  A girl has to have her priorities.

1 stamps

Above is a shelving unit that I got at an estate sale for $5…it was already backed with the peg board.  AND was already painted the pretty Robin Egg blue.  This is where I have most of my acrylic and block stamps organized.

Since moving into my creative space, the space has evolved.  There once was a time that I had a baby play-pen beside my desk.

1 stamp cassette holder

Above is a cassette tape holder that I have had since the 1980’s…..I knew I would need it for something! It’s perfect for holding my ink pads.

Interestingly enough…I have noticed that 2 of the spaces that you have already visited on this Maja Design Creative Team tour, have the very same shelving system that I finally invested in a couple of years back…the Ikea Expedit shelving.  I cannot believe that Jenny rescued hers from the dump!

1 Expedit Shelves

I have 2 of the shelves next to each other and then one row of the white craft shelves from Michaels to fit the final space in the corner, across the entire side of the north wall.  What I personally love about these shelves is that the storage spaces are 13 inches x 13 inches….perfect for your 12 x 12 papers.  And because space is limited for most of us, vertical storage is such a great way to save and expand on space.  AND if that wasn’t enough, there is a ton of storage above the shelves.

1 ribbon holder

So I store a lot of stuff on top of the shelves.  Here is a photo of some of my ribbon.  I bought an over-the-door shoe rack….instead of using it for shoes, I used the spools to put my ribbon on.  This cost me all of $12 at Walmart.  For other storage, I have a relatively narrow buffet that I use to store more of my ribbon stash, and a low 6 drawer dresser for my sticker storage and various miscellaneous ephemera stash.

1 closet catchall

I have a closet in this room (photo above)….which needs a bit of a redo.  I need to make the very most of this space. In here I house a lot of various miscellaneous, my blank canvases, etc.  And,  I use the closet doors for punch storage and to hold a peg board for additional supplies that can be hung on hooks.

1 door storage

1 punch storage

See-through, over-the-door shoe holders are perfect to hold my punches.  They only cost me a few dollars at my local Walmart.  I also have one hanging on the back of my actual studio door. I have very little space go to waste in my room.

1 punch storage 2

And now for my desk…..My desk was bought from Target on-line….and was a birthday present from my dear husband a few years back.

1 my desk


Above my desk is an inexpensive pegboard system that I also bought at Walmart.

It is the same Peg Board that my husband bought for our garage. Easy to install.  I am a very visual person and need to see my supplies.  So I find this works very well for me.

Some other interesting organizational things I have created for my space include a magnet board that I created for all of my Prima/Ingvild chalk inks.  First of all, I am obsessed with these particular chalk inks.  When I saw the entire set on sale at Scrapbook.com, I had to have them.  I glued a magnet to the bottom of each one using E6000 glue, and placed them onto a 12 x 12 decorative metal wall hanging sheet.

Ink Magnet

This keeps them easy for me to get to and organized, especially when using my magnetic We R Memory Keepers cutting mat.  BUT I did see a rather awesome chalk ink organizer on Gabrielle’s desk that has me intrigued…..I have not seen that organizer before.  Maybe Gabrielle can share exactly what type of organizer that is and perhaps where it can be purchased? 🙂

Inks

Another thing that I had to do to get my mists/sprays organized was to create a color board.  I have a lot of mists…and I really needed to be able to see exactly what colors and finishes each particular one created.  I have seen some tag books that some artists have created for this purpose…but as visual as I am, I need to be able to compare and contrast at a glance.  So, using a smallish (I think about a 2 inch) square punch, I punched out a bunch of white squares, and then misted each square with one of my mists/sprays.  Then, I glued them all down to a sheet so I could hang it on my wall for easy reference.  I won’t lie, it is in need of being updated as my collection has grown since I created this board.  But here is a photo of this tool that I frequently use.  After spraying the square, I wrote the color and manufacturer down for easy reference.

Mists and Sprays

I hope you have enjoyed this tour into my home and into my personal creative space.  It has been a pleasure having you over.  I will tell you, I plan on relocating my space to my daughter’s room when she leaves for college (in like 12 years 🙂 ) because she has the most incredible closet that would be amazing for my crafty supplies.  🙂  Here’s some quick pics of her closet space….

closet

closet 2

It even has built in shelves on the insides.  But, shhhhh, that’s a secret for now.

Wishing you a super creative and blessed weekend!  Hugs!

1` A A Nancy-sign (1)


A Little Peek at my Scrap Space

40

Posted by Gabrielle Pollacco

10 May, 2014 -

Write a comment

cupa

Hi everyone! Gabrielle here with you today to give you all a little glimpse into my scrap space.  I love to see where people scrap and see how others organize and keep their scrap supplies.  So today I thought I would share with you a few pic’s so you can see how I like to keep myself organized when scrapping. Join me in having a cup of coffee and let’s poke around my scraproom and maybe even peek in a few drawers, I don’t mind 🙂Room View 1

It’s hard to see the color of my room in this photo (I’m not great at taking inside shots) but my scraproom is a soft fresh green, I find green a nice soothing color….don’t ask about the red chair! LOL…It’s really comfortable, but ugly (I keep saying I will recover it but still have not found time to do it).

83b593cad5d6701764ab41998e25e7d62

I have a tall set of drawers where I like to keep my collection of punches and inks.  I like the flat/shallow drawers because you can see in them at a glance, not digging around to try and find things.

Photo 1

On the right side of my room I have a large Ikea cabinet that I fill with some of my other craft goodies.  The pink bins are great for storing those odds and ends that can look a little messy, snippets of lace and fabric, trims etc.  I also keep my mixed media products on these shelves as well.

Cubbys

My shelves are ever changing with the coming in of new products,….but here I thought I would share a picture I took this week of what my cubbies are holding.  I try to keep my products together by brand.  I have a lot of Dusty Attic paints, for example, that I keep in the large boxes in the top left corner (you see a little peek of them).

Slatwall1

When I was making up my scraproom, I had my dear husband put up a slatwall for me with lots of pegs where I could hang a lot of the embellishments, stamps, tools etc. that I work with daily.  My kids and their friends call it my ‘store’ LOL!  They ask me if they can go into my store to play with some of my stash.

Slatwall2

Here is a closer view of my slatwall, this of course is constantly changing as I use product and add more.  But one thing that doesn’t change is that I am meticulous about keeping it organized.  I don’t like to hunt for products when I’m in the middle of a project, so I keep it in good order so that I can quickly find the product I’m looking for.

Flower jars

Beside my slatwall I have these little floating shelves where I keep my loose flowers and blooms in little glass jars I got from Ikea.

c9011665b1fc71b10e1f3d1fa2bcefdc

One of the most often asked questions I get is ‘What do you do with your layouts that have a lot of 3D elements?’   I have some open frames on my wall where I like to display these and change out the design every couple months or so. If I can find more of those frames, I’d love to add a bunch more to my wall and really fill it up, because heaven knows I have a LOT of 3D/thick page designs.

I hope you enjoyed a little tour of my scrap space today.  The truth is, that I scrap where-ever it makes me happy to scrap.  Sometimes I scrap in my scraproom, sometimes in our bedroom with my supplies all layed out around me on our bed.  And if I’m filming one of my videos, I like to work on my dining room table where I get the best light for filming.  Wherever you scrap, the important thing is that you enjoy it and that you get that happy creative buzz when you are doing it.  Happy Scrappin’!!

Gabrielle-sign