Spring Greetings

3

Posted by Ivana Camdzic

2 May, 2013 - ,

Write a comment

Hi everyone! Ivana here today with a little twist on the beautiful new Vintage Spring Basics collection. I love all the soft and delicate colors and patterns in this set of papers, esepcially since I am a big pastels fan. I know not everyone loves to create with pastels, though, so I wanted to see if these papers would work well with an entirely new color palette. I combined the pretty patterns and colors with a few boldly-colored buttons and accents, and I love the result!

sweet birthday wishes 1

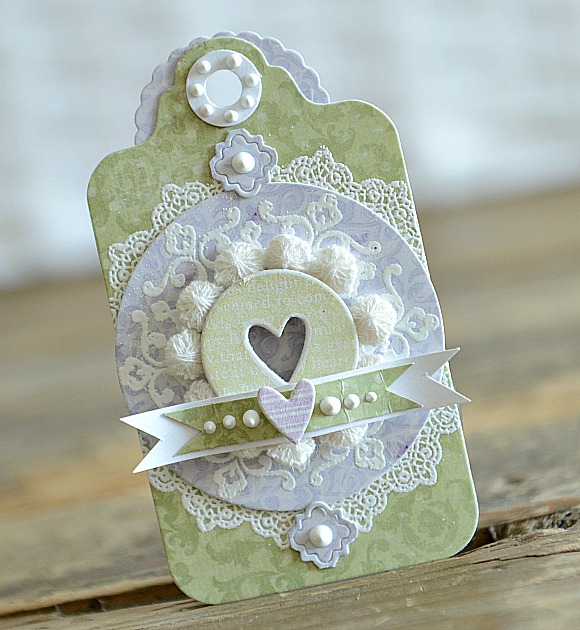
For the two parts of the card background, I used a gorgeous lilac pattern – ‘8th of April’, and for the darling rooster, I used the pattern entitled ‘2nd of March’.

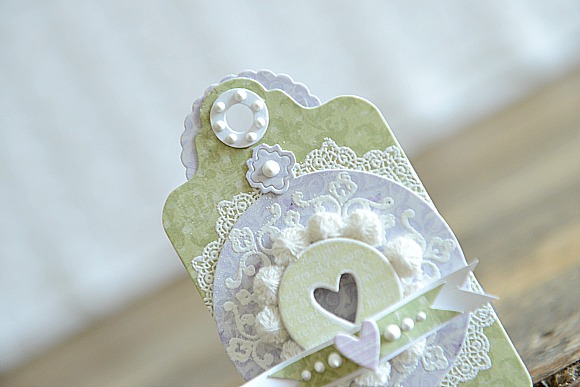
I started by adding a paper doily to the background, and then by adding various stamped doilies in a bold teal color, as well as a collection of buttons in a yellow, lilac and deep purple mix.

sweet birthday wishes 2

I really love the way the bold accents offset the pastel base, and I really like the way this card reminds me of a colorful field of flowers…Perfect for spring!

sweet birthday wishes 3

Among the buttons, I added a little die-cut scalloped circle, embellished with a couple of hearts and colored to match the gold-toned buttons.

I added this particular sentiment to card because it reminds me of a ‘farmer’s market’ font, and adds to the homespun nature of the all the little elements on this card.

Supplies: Maja Design Paper (Vintage Spring Basics: 8th of April, 2nd of March), Papertrey Ink Cardstock (Rustic Cream), Papertrey Ink Dies (Love Lives Here, Filigree Border), Papertrey Ink buttons, Stampin’ Up Quint Essential Flower Stamp, EK Success Flowerburst Punch, WPlus9 Fresh Picked Stamp, Paper Doily from my stash.

Sending many happy springtime wishes your way!

Ivana-sign

To You. From Me. With Love. (And a Tutorial!)

8

Posted by Ivana Camdzic

18 April, 2013 - ,

Write a comment

Hi Maja Fans! Ivana here today, to share a homespun card I created, along with a little tutorial which took me only a few minutes to do, but adds so much fun to a card or layout!

card 1

This card is full of homespun elements, with all of it’s county motifs and lively colors. Peach, purple and green are a new palette for me, but I think this might become one of my new faves in my repertoire. But before I get to the card, and how I put it all together, I want to share a SUPER duper quick little tutorial, on how I made the little window for the base of the card.

All you need to master this technique is a piece of paper, a smaller and slightly larger die, and some clear cardstock. Let’s get started!

tutorial 1

I started with my card base, which is cut out of a beautiful Maja Design paper from the Ska Vi Ta En Fika collection (Marzipanbakelse). I traced a pretty die-cut at the top and then fussy cut it with my scissors.

I then ran my paper through my Big Shot with a heart die.

tutorial 2

This is what it looks like when you are done – a basic negative image of your shape. The sky is the limit here, as you can use all sorts of shapes and combinations to make your little window.

I decided to stick to the hearts as it nicely fits in with my cards theme…”To You. From Me. With Love.”

tutorial 3

Next, I cut a smaller heart out of felt, but you could use any material you like, such as paper, chipboard, fabric…The list is endless!

tutorial 4

Now, you might not see the little bit of a trick here – the piece that holds the smaller felt heart – in the ‘seemingly’ open window.

It is simply a piece of acetate (clear cardstock) cut to fit the back of the card, and fully cover the negative shape that was die-cut.

The next step is to just adhere the little heart to the acetate and viola!

tutorial 5

I decorated mine with liquid pearls, of course, and then added the rest of the card to this easy and fun base!

card 2

Now that we have the back part done, let’s get back to the rest of the card.

The card front is a combination of several layers…The back piece – a simple white cardstock, followed by a beautiful lilac paper from the Vintage Spring Basics collection (9th of April), followed by yet another piece of cardstock, stamped in a lovely apricot color, using the Mini Bloom stamp set from Papertrey Ink.

card 3

The centerpiece of this card – and my fave new stamp! – is the ever-so-cute little mason jar.

card 4

I decorated the jar with buttons, borders, and little die-cut flowers and circles, as well as a sentiment from the Mini Blooms stamp set, with twine along the bottom and top of the sentiment.

Supplies: Maja Design Paper (Ska Vi Ta En Fika – Marzipanbakelse, Vintage Spring Basics – 9th of April), White Cardstock, Papertrey Ink Stamps (Mini Blooms, Rosie Posie, Friendship Jar), Papertrey Ink Dies (Heart Prints, Jar Die), WPlus9 Die (Quilt Cuts #1), Papertrey Ink Pads (Smokey Shadow, Winter Wisteria, Spring Rain), Buttons and twine from my stash.

I hope you’ve enjoyed today’s little tutorial and my jar card!

Thanks so much for visiting,

Ivana-sign

Sweet Baby

9

Posted by Ivana Camdzic

4 April, 2013 - , , ,

Write a comment

Hi friends! Today I am celebrating the news of a brand new sweet little girl. We have had such an abundance of little boys in our lives lately, that I have been busily making new baby cards..All in boy themes.

I had to dig out my stash and create something different this time around, and it was so fun. I really love girly cards, because I can get carried away with lots of feminine details and plenty of glitter, sparkles, lace and cute, tiny, hearts.

7

I think the Maja Design papers used here are just the perfect baby card colors and it was so much fun dressing them up for this card!

I used a mix of Vintage Summer Basics (#1911) and Life in The Country (In the Hammock).

{p.s. If you love the Life in The Country collection, I am currently giving away the ENTIRE 12×12 collection, all you have to do is visit my blog to enter!}

8

For the background, I used a paper from the Antligen collection (Vardagjamning) and added a piece of the lovely gingham print to the bottom. I added a smaller bit of the floral paper, and stitched it to the base of the card. Over that, I layered a die-cut doily, onto which I stamped a motif in kraft ink, as well as a round sentiment in black ink.

The teensy heart is a stamped image which I cut out, and embellished with an even smaller heart which is covered with German glass glitter.

Just above the doily, I added another layered embellishment with die-cut pieces and a strip of lace. At the very top of the card, I used a pretty pearl embellishment from a really old set of Prima pearls. I thought this was just the perfect card to use these little beauties up.

10

 Another layer of lace at the bottom, along with another little heart and sentiment, and voila!

Supplies Used: Maja Design Papers (Vintage Summer Basics – 1911, Antligen – Vardagjamning, Life in the Country – In the Hammock), white cardstock, black and kraft ink, Papertrey Ink Doily Die, WPlus9 Quilt Cuts #1 Die, Inkadinkado Stamps, Melissa Frances German Glass Glitter, Lace from my stash.

I adore the way these beautiful papers make the card so soft and delicate…Just like little baby girls. I also have to add just how much I love the round sentiment, and how much it makes me think of little girls and how we all once lived in our own fairy tales, and an infinite land of our imaginations…It is something I hope every little girl will hold onto for the rest of their lives.

 Much Love,

Ivana-sign


Made with Love

6

Posted by Ivana Camdzic

21 March, 2013 - ,

Write a comment

Hi Maja friends! Ivana here today to share a little shabby card with you. I used the Vintage Summer Basics collection for this card, and used the February Mood Board colors as inspiration. I love to keep the Mood Boards saved on my computer for inspiration on those not-so-inspired days. Makes creating much easier when you have a beautiful palette to work with!

1

For this card, I started with a base using the gorgeous Vintage Summer Basics paper #1911. To that, I added a white cardstock paper stamped with stitched sentiments and motifs using Paptertrey Ink and The Craft’s Meow stamps.

6

I added a strip of glittered Scor Tape (1/4 inch width) to the right side of the card, and sprinkled it with chunky, vintage glitter. I then added two little distressed buttons (which I lightly colored with my Copic markers), a teensy felt heart and some liquid pearls.

4

To the center of the card, I added a vertical piece of white lace, and a punched bit of paper (using #1933 from Summer Vintage Basics). I layered a stitched felt tag over the lace and papers, followed by two banners (one stamped with PTI stamps, the other using paper #1933), and finished off with a little painted cherub from my Etsy shoppe, and a pink felt tag, with a heart center.

2

Just before I added the ribbon, I stitched the two layers of the card together. And last, but not least, I added a shabby, hand-dyed ribbon to the top of the card, along with a stick pin and heart tag.

3

Supplies: Maja Design Paper (Vintage Summer Basics: #1911, #1933), White Cardstock, PTI Stamps (Stitched Sentiments, Love Lives Here, Button Boutique), TCM Stamps (Inspired by Audrey), PTI Dies (Love Lives Here, Tiny Tags), Martha Stewart Edge Punch (Deep Floral Vine), Scor Tape and Chunky Glitter, Ribbon and Cherub from my Etsy Shoppe (Ivana`s Creations).

See you next time!

Ivana-sign


I Am Here For You

7

Posted by Ivana Camdzic

7 March, 2013 - , ,

Write a comment

Hi everyone! I have had spring on my mind lately, and so today I share with you a project, inspired by the colors of spring and this beautiful Maja Design Mood Board!

MoodBoardMarch

Here is my take on these lovely colors, using some very, very pretty Maja Design papers.

First up, I created a vintage-inspired card with a fresh take using these cheery colors and many layers of lace, and pretty trims.

I adore combining soft colors and plenty of texture, to create my cards. I always find that the textured bits always stand out so much more when paired with soft colors.

To make this card, I started out with a white card base, and layered a die-cut button card, soft lilac lace, as well as this gorgeous, green Maja Design paper (Marzipanbakelse). I stitched the layers to the card base, and then I added a die-cut quarter-foil motif out of this beautiful purple Maja print (Syrenen Blommar), as well as a vintage trim from Maya Road.

To the center of all of these layers, I added a die-cut and stamped heart and circle combo from Papertrey Ink. Two very sweet, and slightly embossed leaves finish this little embellie off perfectly.

Just below the button card layers, I added two white banners and stamped the top layer with a lovely sentiment.

Oh I forgot to mention, before I did any of the above steps, I stamped the background of the card (bottom portion only), using some pretty dots and dashes and soft green and purple inks. To add a bit of dimension to the stamped bits, I adhered left over punch-outs from the die-cuts, as well as a little heart button (which I softly distressed with white paint).

I have to admit, I loved the color combination so much, that I decided to keep creating, so I made a matching gift tag!

I used this green paper from Maja Design as the background.

To the back of the tag, I added a scalloped circle cut from more pretty Maja paper.

Just below that, I stamped and embossed a doily motif in white, and then began with my layers all over again.

First, I added a die-cut circle from this purple Maja paper (onto which I also stamped and embossed), then a tiny little circular row of the pretty Maya Road trim, and to finish it off, a die-cut and stamped circle tag. To that I added a little banner embellishment, and a few liquid pearls.

So easy to create when you have beautiful inspiration like the Maja Mood Board!

{For more creative designs inspired by this mood board, or to learn how you can play along in this challenge and WIN, click here.}

Supplies: Maja Paper (Ska Vi Ta En Fika – Marzipanbakelse, Antligen – Syrenen blommar), white cardstock, Papertrey Ink stamps (Love Lives Here), The Craft’s Meow stamps (Inspired by Audrey), Maya Road vintage trim, Papertrey Ink dies (Button Card die, Love Lives Here dies, Tag Sale #1), Liquid Pearls, Lavender and Soft Green ink, Lace and Buttons from my stash.

Be back soon with more projects!

Ivana-sign