The Vintage Travel Boxes

4

Posted by Silje Kristin Aunan

20 September, 2015 - ,

Write a comment
Hello Everyone
Today it is me Silje Kristin, that will inspire you <3
It’s finally Sunday, and I’m ready for my new post for Maja Design <3
This time I’ll show you a couple of large boxes, that were in a Norwegian Scrapbooking magazine, Ett Trykk.
I have decorated two tin boxes some lovely Maja sheets.
On this boxes I’ve used patterned papers from Maja Design’s collection The Vintage Spring Basics.
This is one of my favorite collection, the colors in the sheets is lovely and complex with the pattern. Its makes it easy to mix sheets and colors to the projects you create.
I have chosen to use the blue sheets from the collection.
Vintage-Spring-Basics-P
I came across these tin boxes in a Norwegian store, called Sisters Grene. I removed the metal fasteners behind the box and lock in the front, before I dresses the sides with paper from Maja Design.
All the edges are blackened with distress Walnut Stain.
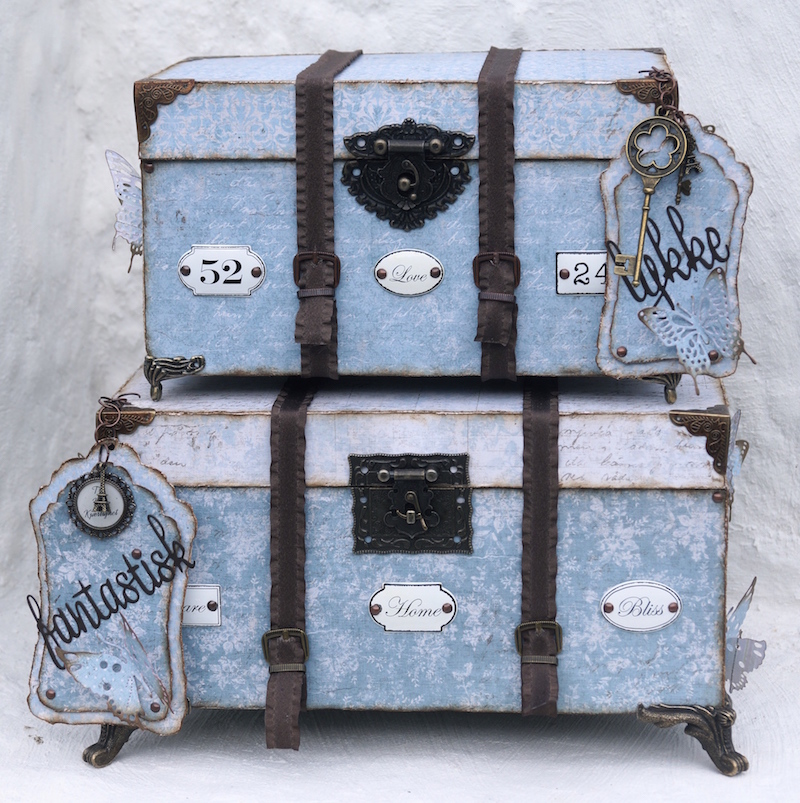
Both boxes are decorated with the same details. Instead of using a lot of flowers I decided to use metal details.
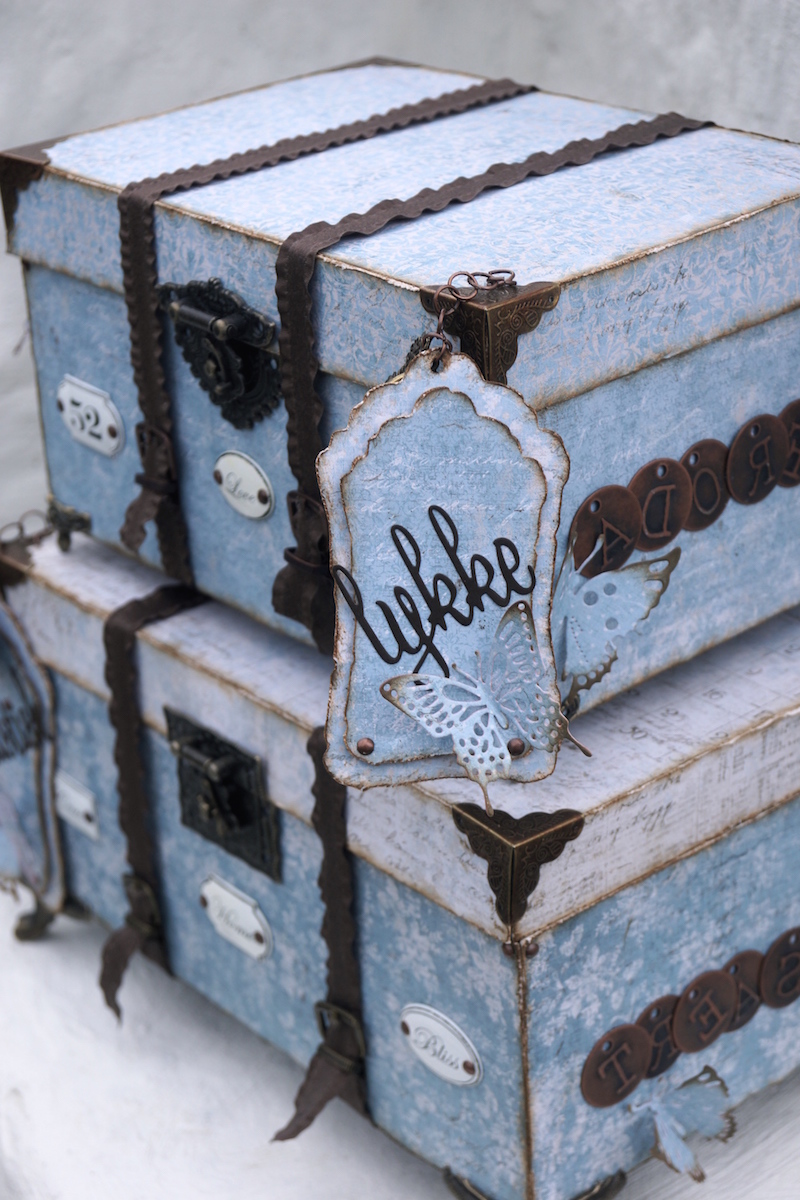
The biggest box stands on four large metal corner feet. The brown ribbon, going round the box and is fastned in metal from Tim Holtz. I have also used white metal plates with words from Prima: Bliss – Care – Home. On the lid I have used metal corner, but in the other corner you will see brown brads.
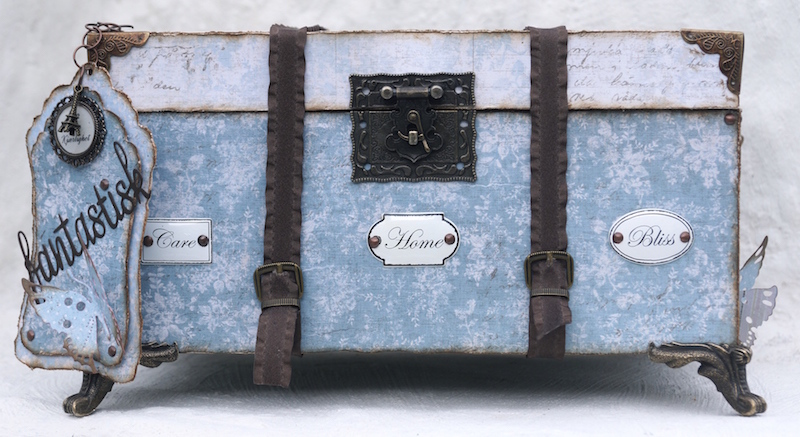
The metal clasp on the front is from Fab Scraps.
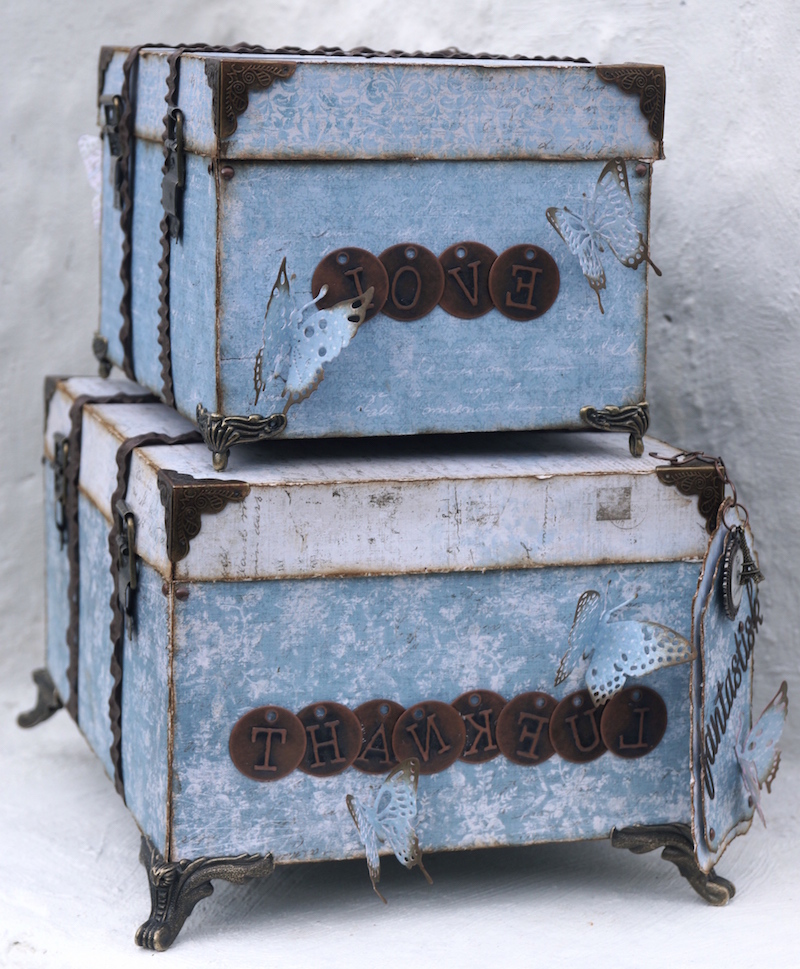
On the side of this box I’ve put together words on eatch side, Thankful and Treasure.
The butterflies are from one set from BoBunny with three butterflies dies.
On the smallest box, you will find the same metal decorations as the largest box. Metal plates on this is with numbers and words: 52 – Love – 24. The metal feet are smaller on this box then the bigest one.
On the side of this box, you will find two new words: Adore and Love.
The words give a whole to the boxes and what they symbolize <3
To the boxes I’ve created two different tags, punched out with one set of dies from Nellie Snellen.
On the tags on the bigest box I have used one dies from kaBoks with one word
Fantastic on. Metal decorations on this is charms and a amulet with the words Faith – Hope – Love. The tag are attached with metal rings to the lid on the box.
I have also used a butterfly and some brownbrads.
On the smaller box is the tag slightly smaller. The metal decor is a big key and a small key, I’ve also attached a smal eifel tower on this tag also.
I also spent a die from kaBoks with the words Luck on.
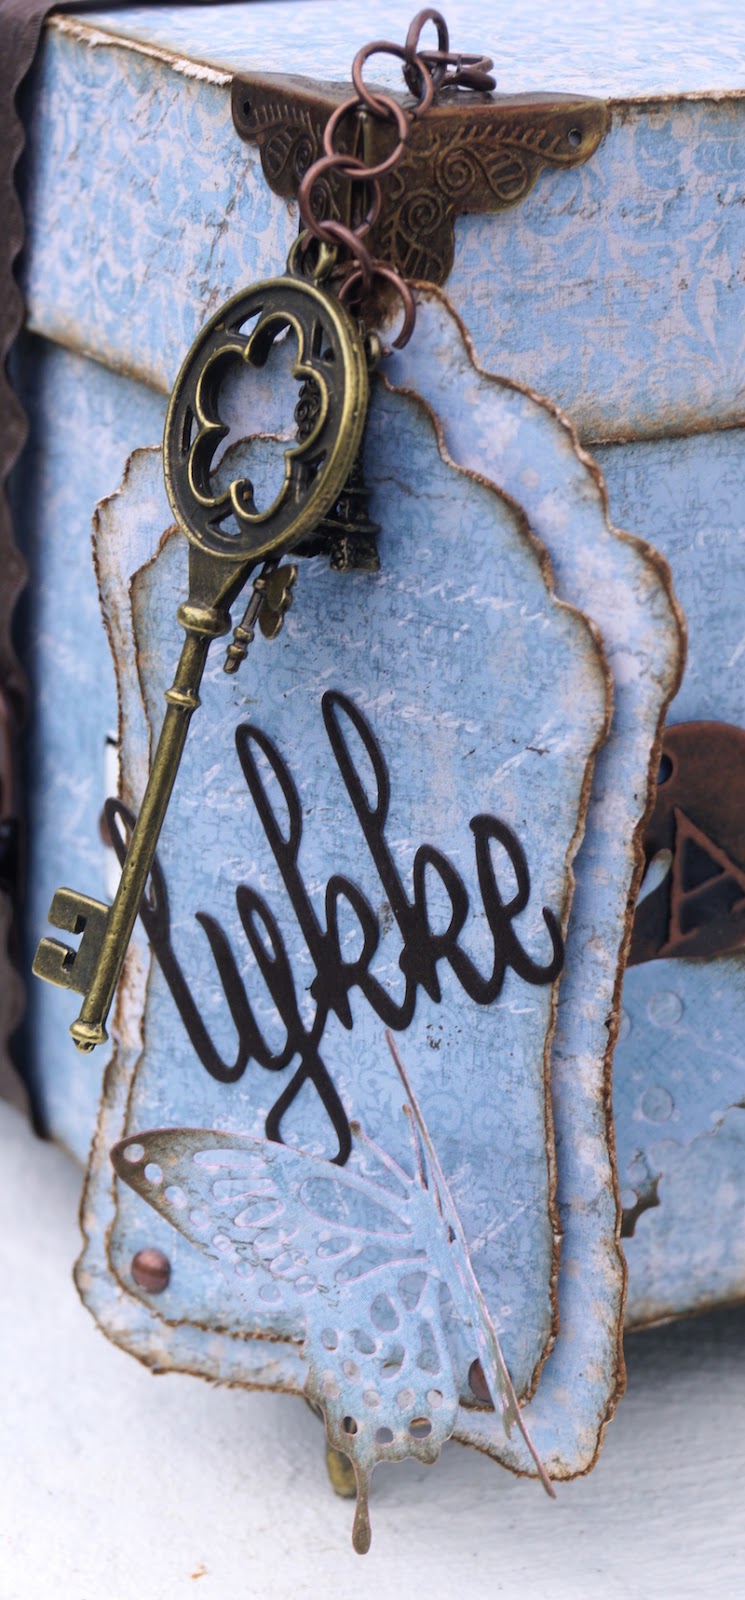
The Butterflies are blackened with the same Distress used elsewhere on the boxes.
The back of the boxes are simple, here are just the metal loops that secure the lid to the box.
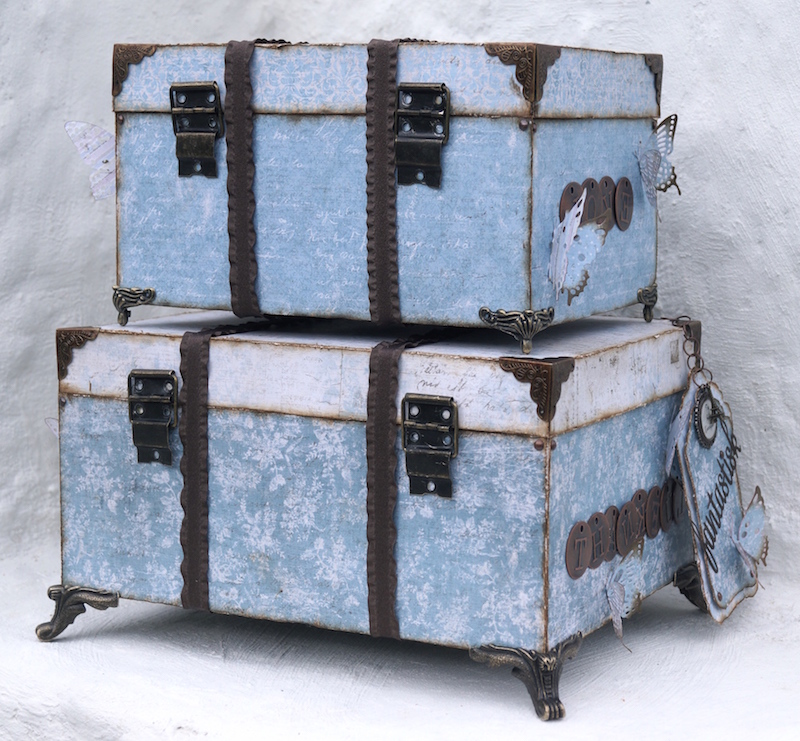
And this is my Vintage Travel Boxes, made with the most beautiful sheets from Maja Design <3
 
 Have a GREAT day everyone <3
 SiljeKristin-sign
 

Enjoying Outdoors – new collection..!

5

Posted by Carita Ruckman

19 September, 2015 - ,

Write a comment

I’m heading outside to enjoy the fresh air and all the wonderful colours in the nature.. I grab my lilac rubber boots, my hat and my favorite umbrella. It’s like my grandmother always used to say “There’s no such thing as bad weather, only the wrong clothes”.. In Swedish this is an old saying that actually rhymes so nice (“Det finns inget dåligt väder, bara dåliga kläder”).

And it’s so true..! I wouldn’t miss this time of year, for the world..!

In my picnic basket I have some tea and muffin, and of course also my camera. You’ll never know how long I’ll be away and what I’ll might find on the way…

Here in Scandinavia, the nature will soon go into its winter sleep and we will embrace every last of its spectacular drama, photograph the beautiful different hues and make it into wonderful memories in our scrapbooks..

Our new collection is all about that – autumn, nature, garden, whimsical weather and magnificent colours.

Enjoying-Outdoors-L
Collage Enjoying

Collage2

See the whole collection here, and find your nearest store here.
And some inspiration for a first craft project with this fabulous new collection…

Boots Enjoying OutdoorsEnjoying Outdoors - boots
Enjoying my boots
Enjoying my outdoors bootsEnjoy my boots
Outdoor boot

Camilla-sign


Pinterest

Facebook

IInstagramYouTube

Matchbook Mini Album

4

Posted by Cathy Mc Grath

18 September, 2015 - ,

Write a comment
cathy - album 4

Hello everyone! I do love mini albums and I have to be in the mood to create one as they are time intensive but extremely rewarding at the end. The mini album I have to share with you is a project that you can complete in a few hours! The other amazing thing about this project is it only uses ONE sheet of paper. To create this album, I followed a tutorial by Kathy Orta which you can see here.

cathy - album 2

The album uses ONE 81/2″ by 11″ piece of cardstock for the base. I decorated it using papers from the Ska vi ta en fika Collection. As you can see, there are pockets to insert tags and places for photos and journaling.
Cathy - Mini album 1

To complete my album, I have printed my photos using a sepia filter. They each measure 5cm square. To embellish, I have used flat flowers, stamping and also punches and dies to personalise my album.

IMG_2524

To create the curved edge to the front cover of my album, I used a Spellbinder curved border die. I also used any vintage stamp in my stash that would compliment the photos. I had mini themes for each photo where possible.

IMG_2527

As the album is quite compact, it is amazing how you can make your embellishments work for you because of the scale of the project. I have used some Stampin’ Up! Tag punches and they fit perfectly in the pockets. Extra stamping on them on left over papers makes beautiful embellishments quickly and easily.

Cathy - Mini album 2

I decided to add photos to the back of some of the flaps, so in this compact album, I used five photos in total! I also used Green Tara flowers to embellish my photos as they are relatively flat and perfect in terms of their size.

IMG_2534

Once decorated, I have just used ribbon as my closure, nothing complicated.

Maja Design Products Used:

Fika-L1

This really is a great project to make as a stand alone, but it could also be used as an insert for a mini album project if you made a  pocket to accommodate. I hope that you’ll give it a try!

Hugs,
Cathy-sign

mm

Cathy Mc Grath

Hi! I'm Cathy. I live in Sydney and am a Primary School teacher. I am passionate about teaching and love what I do. At present paper crafts are my creative outlet, which is my other passion. I am drawn to vintage, shabby chic styled crafts which I love to create. I do enjoy other crafts such as sewing, quilting, knitting and crotchet…not enough time! I am always inspired to learn and to try new techniques in both teaching and my crafts. I love Maja Design papers and enjoy creating with them.

Thank You card

0

Posted by Jelissa Mei

17 September, 2015 - , , ,

Write a comment

Hello Maja fans!

I’m excited to be up on the blog today to share a card I made using Maja Design’s Autumn Basics collection. Some of you may know, our baby girl arrived last Tuesday morning and we’ve received lots of well wishes for her, as well as gifts all the way from Sweden, Malaysia and even Australia! This Thank You card is meant for one of my fantastic scrappy pals who sent her love all the way across the sea.

IMG_0169

I’ve layered papers from the Autumn Vintage Basics collection seeing how the weather is cooling down these days in Singapore – a good thing for me as I’m now on a diet that makes me perspire endlessly. It’s part of my Chinese culture to make sure that mothers who have just delivered get the best nutrition to help their bodies recover from childbirth.

IMG_0173

I’ve kept my background simple because I want the designs on the papers to show. Some splattering of paint and watering it for a water-color effect (this is so trending now!), and fine stenciled designs just to keep the composition in place. I’ve also added twine to my flowers for a more rustic autumn look.

IMG_0174

Some fussy cutting over here which helped me to relax after a hectic morning of bathing baby, having my breakfast and catching up with some housework. To make the fussy cut flowers stand out, I popped the image up with 3D foam dots and dabbed Sticklers for a bit of glittery goodness.

Hope you like what I have shared with you today. Do drop by the blog again for more inspiration from the design team!

Maja Design papers used:

Autumn-Basics-P

No. IV, No. X

Vintage-Spring-Basics-P

1st May

Other supplies:

Chipboard: Blue Fern Studios
Mediums: 13@rts, Colorarte, Rangers
Flowers: Prima Marketing Inc

Jelissa-sign

Back to the 50s

0

Posted by Heidi Augustson

16 September, 2015 - , ,

Write a comment

Good morning Maya fans! It’s Heidi here with you today from a rainy and clouded Norway. We can no longer deny it, autumn is here.

IMG_1675

Do you like the 50s? Today I have made a card inspired by that period.

IMG_1673

This is a pocket card that I have made with several panels I have cut with dies and put together layer by layer.

IMG_1682

Inside the pocket you find this yellow card where you can write a greeting. I have used the papers “Life jacket” from Life by the Sea and “Long summer nights” from Summer Crush.

Life-by-the-Sea-P

Summer-crush-K

I wish you all a lovely day!

IMG_1679


Heidi-blogsign


mm

Heidi Augustson

Crafting has always been a passion of mine, and since I discovered the amazing world of papercraft years ago I have been completely addicted to it. I love the shabby chic- and vintage style and most of my projects are characterized by the use of vintage photos, lace, flowers and romantic details