Interactive christmas card

3

Posted by Kerstin-Inga Peters

6 December, 2019 - , , , ,

Write a comment

Welcome dear Maja friends!

–  Maja Design meets Tim Holtz –


I was inspired to create a Pop – Up season card in vintage style.

I love it to use the amazing cutting dies from Sizzix

with the very good qualitiy papers from Maja Design.

 Always a perfect combination with Distress inks as well.


 Tutorial Interactive card


 choose a paper and cut it in 300 x 150 mm


fold the mountain and valley folds according to the given measurements

(Score lines)

two cut lines

here can you see the mountain and valley folds

ready :-)!!

…and now comes the best part

Let your imagination run free

and create a card  according to your own ideas.


some close up’s

I used some amazing papers from the latest Christmas/ Winter collection Holidays in the Alps

and from the older, but wonderful as well ‘I wish’ collection

Winter Ephemera

Winter Ephemera

Deers

Deers

 I-wish-P

I wish for frosty mornings


Many thanks for your visit!

I wish you a beautiful advent season!

Welcome Baby Shaker Card

3

Posted by Maja Nowak

10 October, 2019 - , , ,

Write a comment

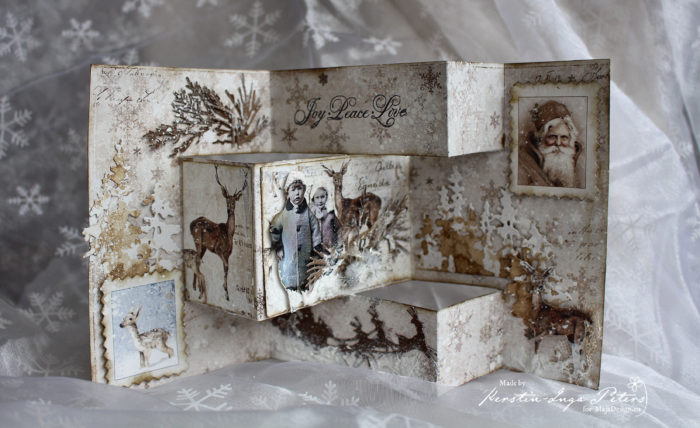
Good morning, dear Maja Fans, welcome to the blog today 🙂

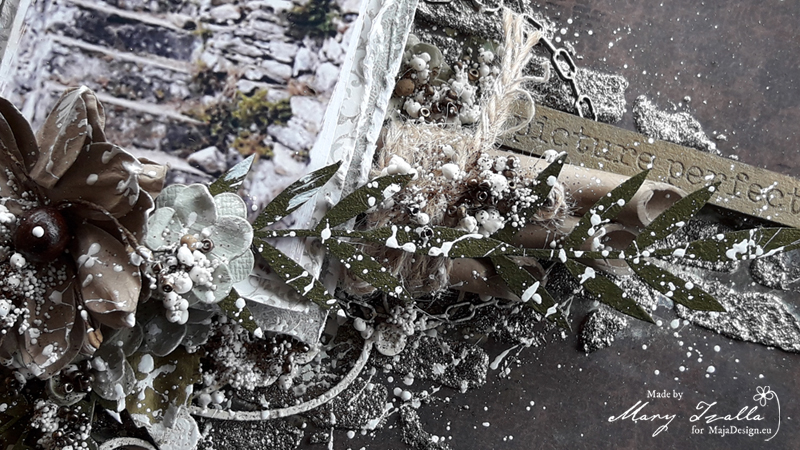
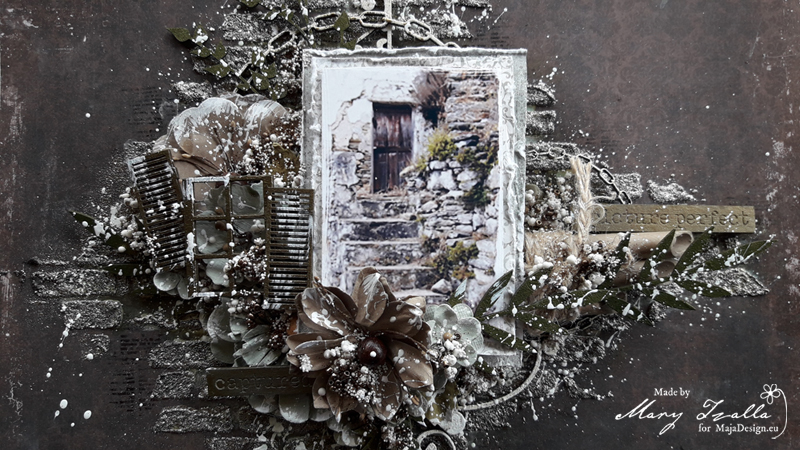
I really love the look of shaker box projects. They offer some dimension and fun elements and are simply interesting to look (and play!). But I seldom make shaker box cards. And when I decided to make a welcome baby shaker card, I was quickly reminded why.

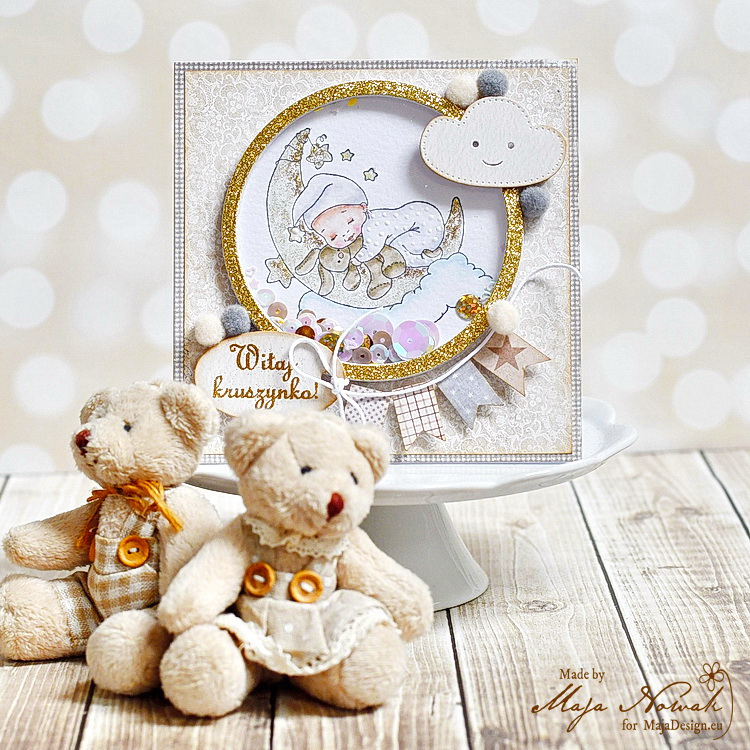
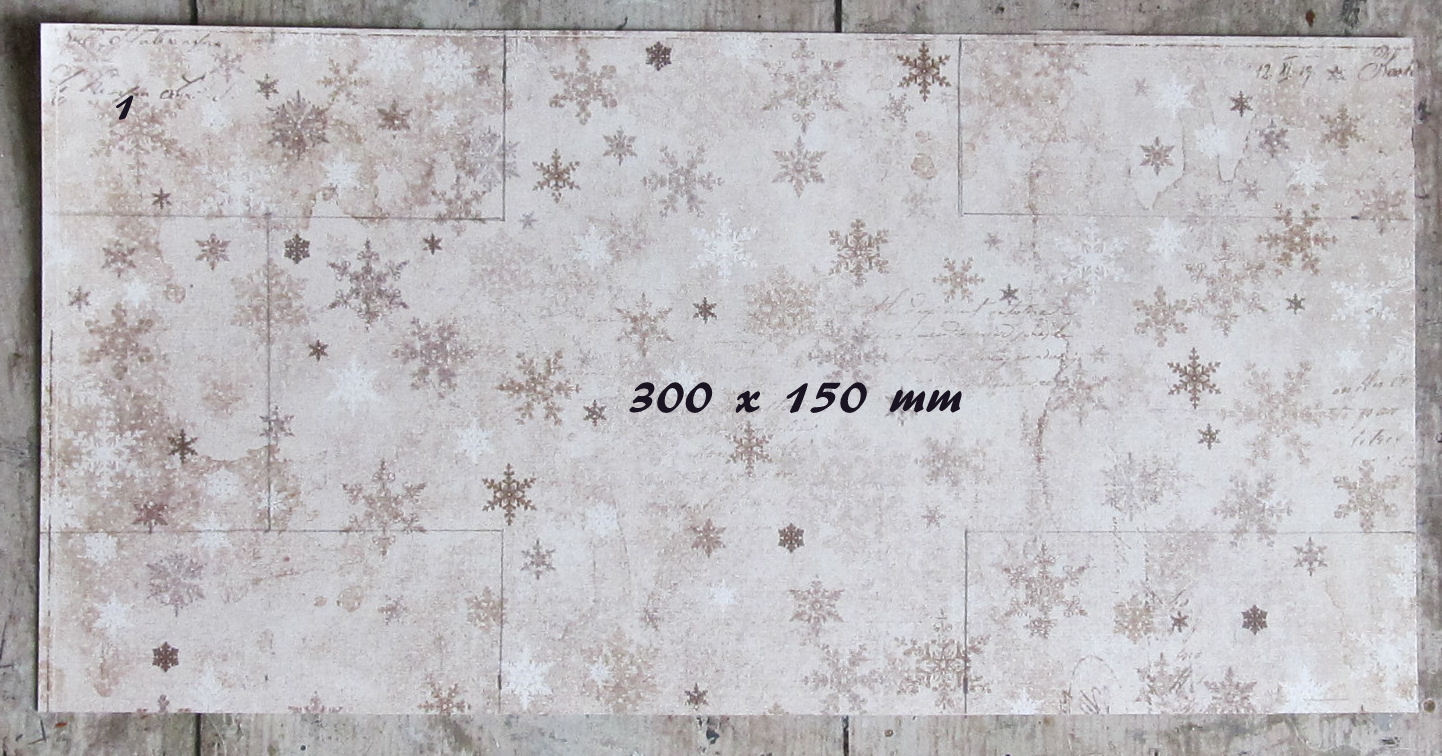
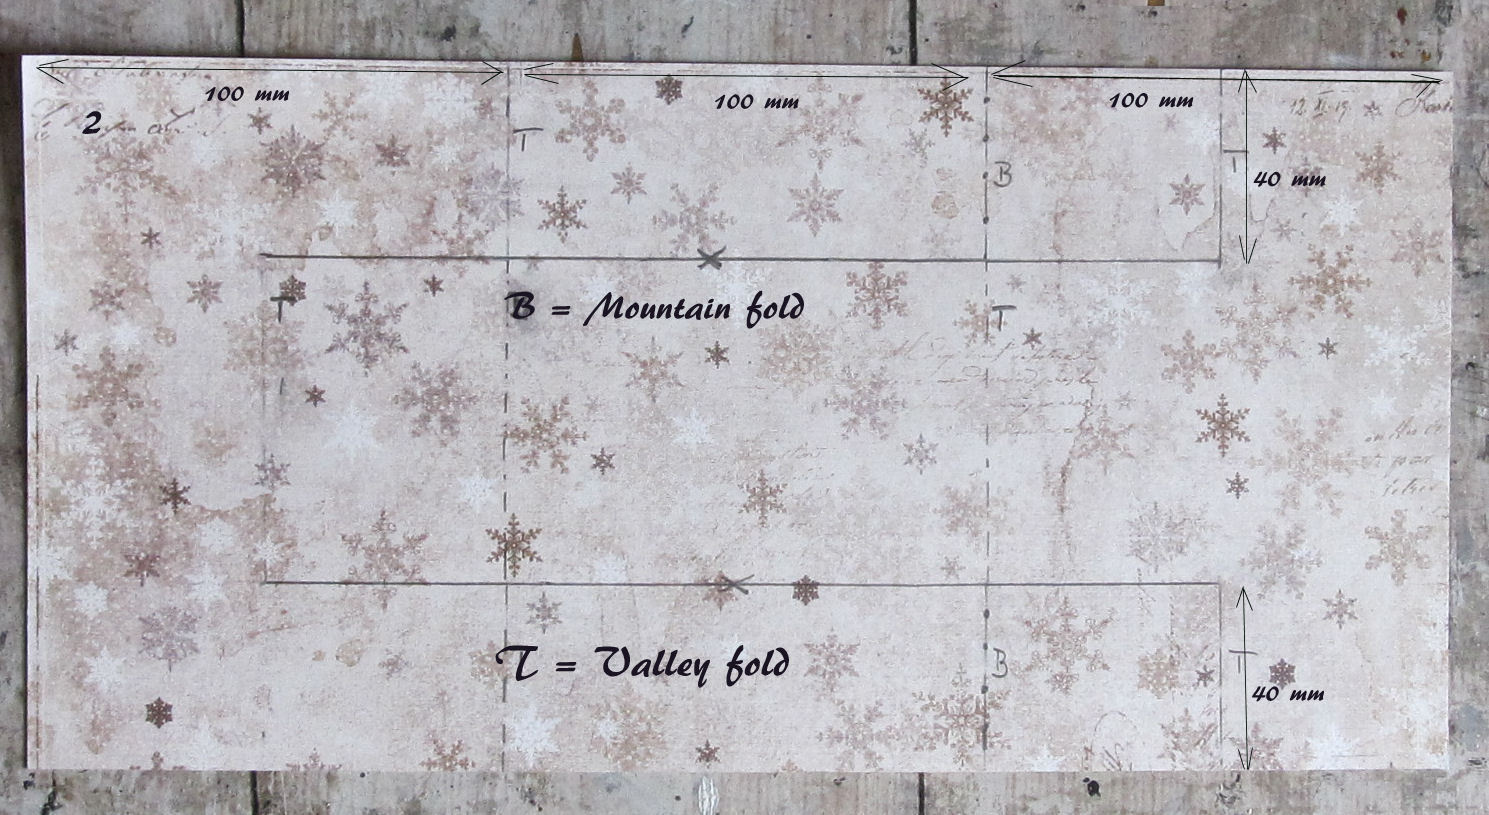
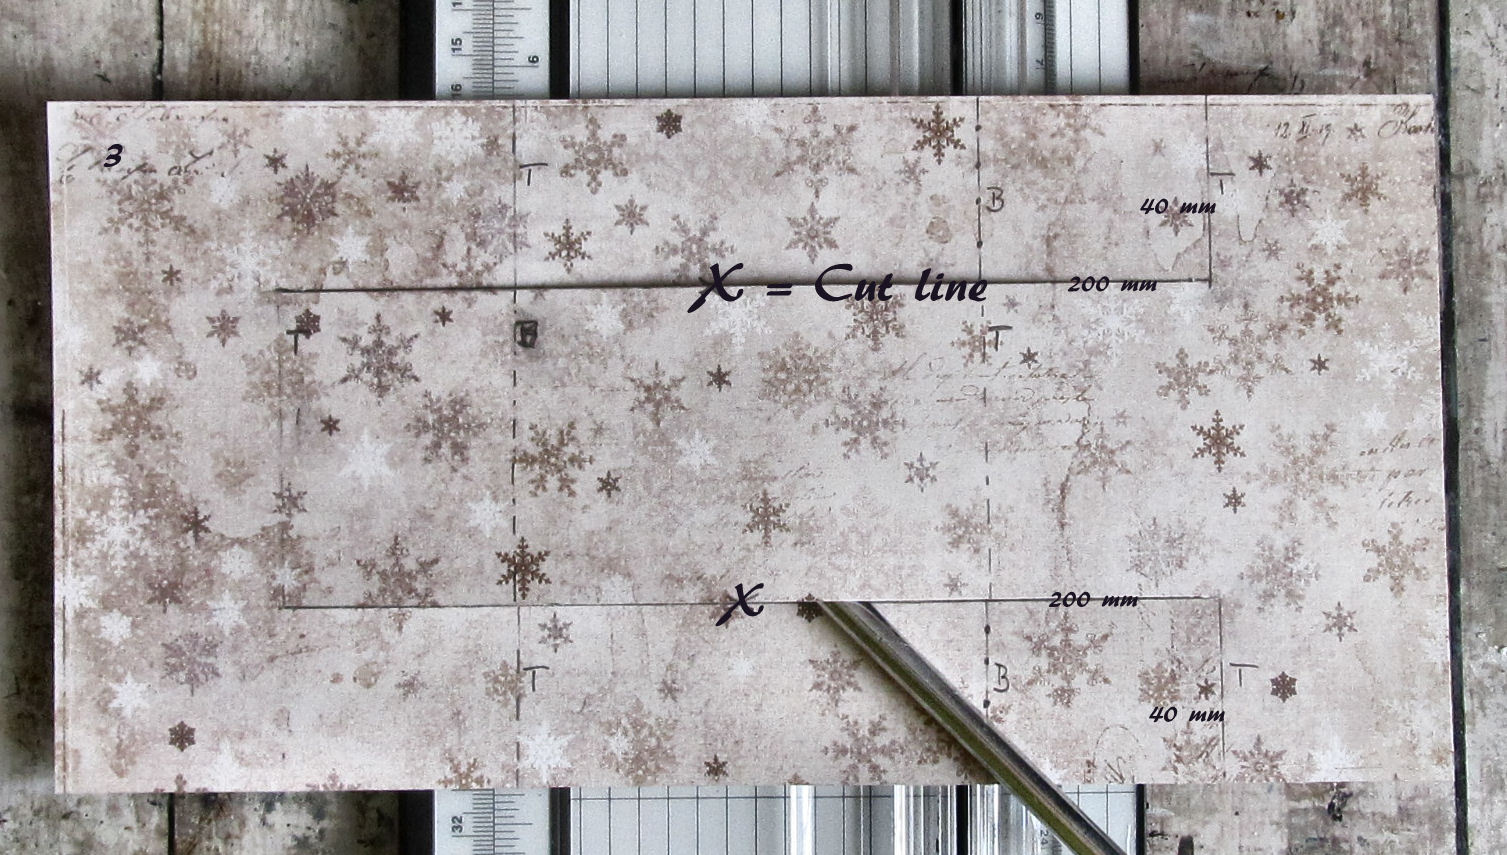
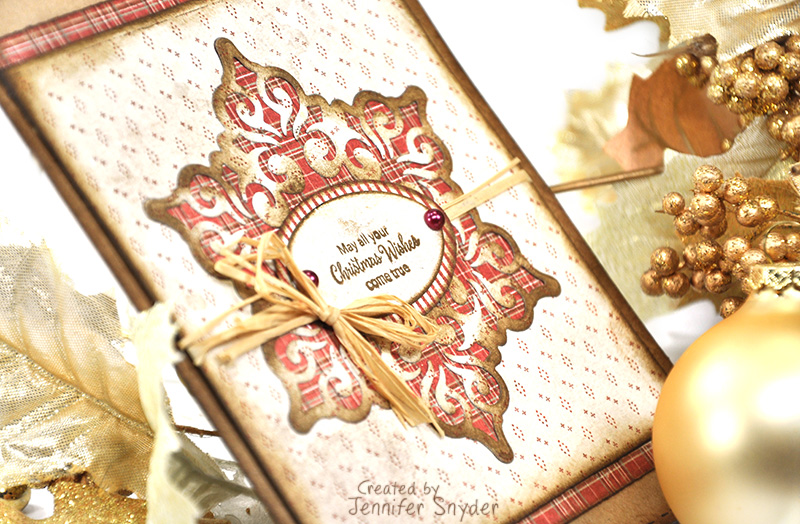
First of all, it’s easy to make shakers with square or rectangular shapes, but not so easy with other, even as basic as the circle. The capsule must be sealed tight so that the contents of the shaker do not fall out. I made many of shakers using adhesive foam squares, but with round shapes they might still leave tiny gaps, so I decided to die-cut round frames and stack them up to make the shaker box, thinking it would save me some time. Boy, was I wrong! To make a 0,5 cm high frame I had to die cut 8 pieces and then glue them one by one together. By the fourth layer the frame started to get crooked no matter how precise I tried to be! The frame is pretty thin, so that was the problem. But finally I managed to create a more or less even frame.

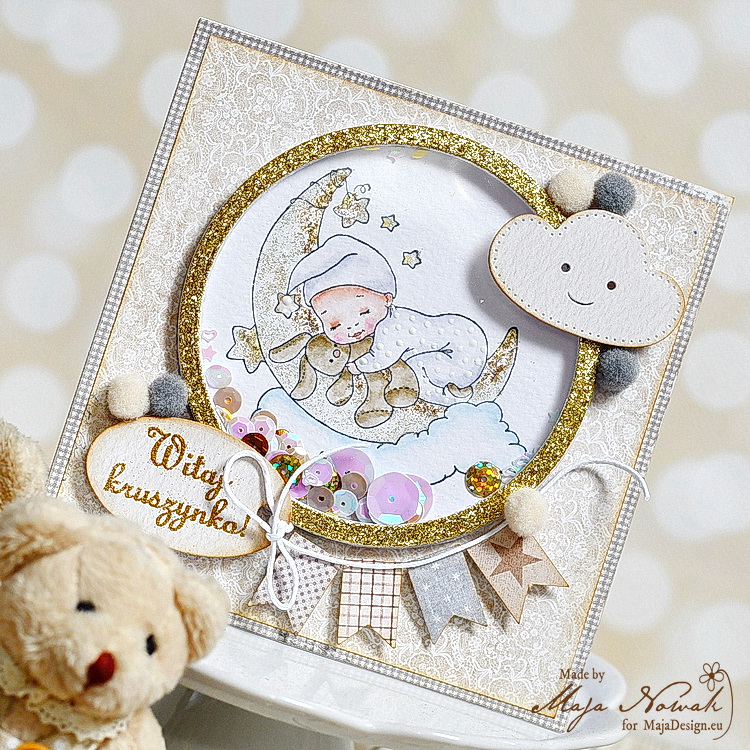
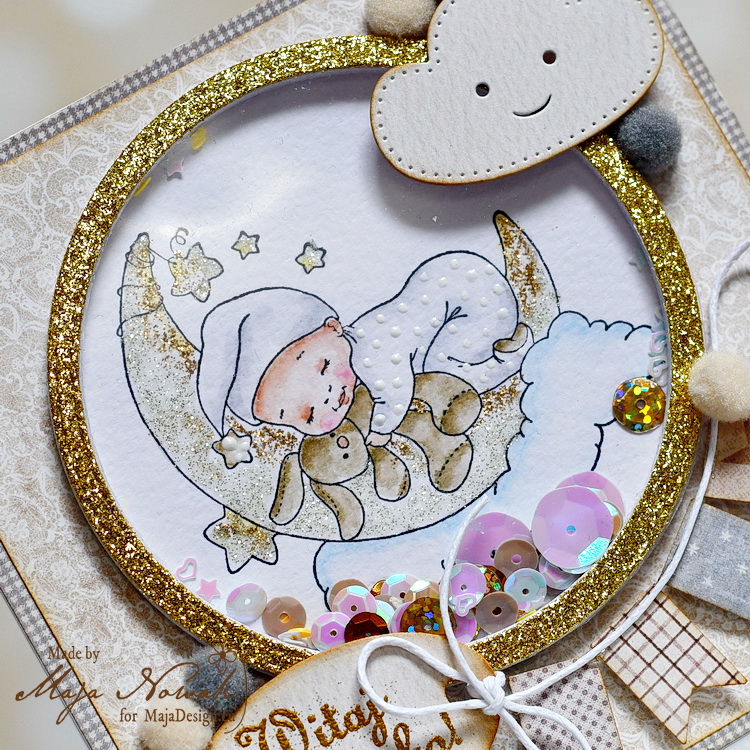
The next problem appeared with the window. I use thick laminating foil for my shakers and with smaller elements I never had any problems, but with this pretty large window the sequins I put in were jumping out or clinging to the foil due to the static electricity. I used soem anti-static spray to deal with it, some also use anti-static powders or pads that are designed for embossing. Finally I was able to assemble my card 🙂

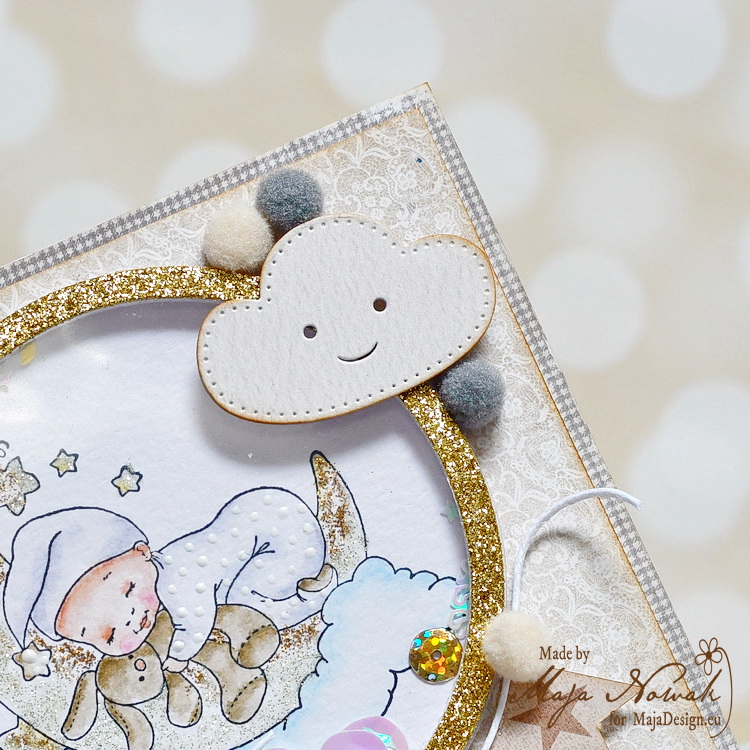
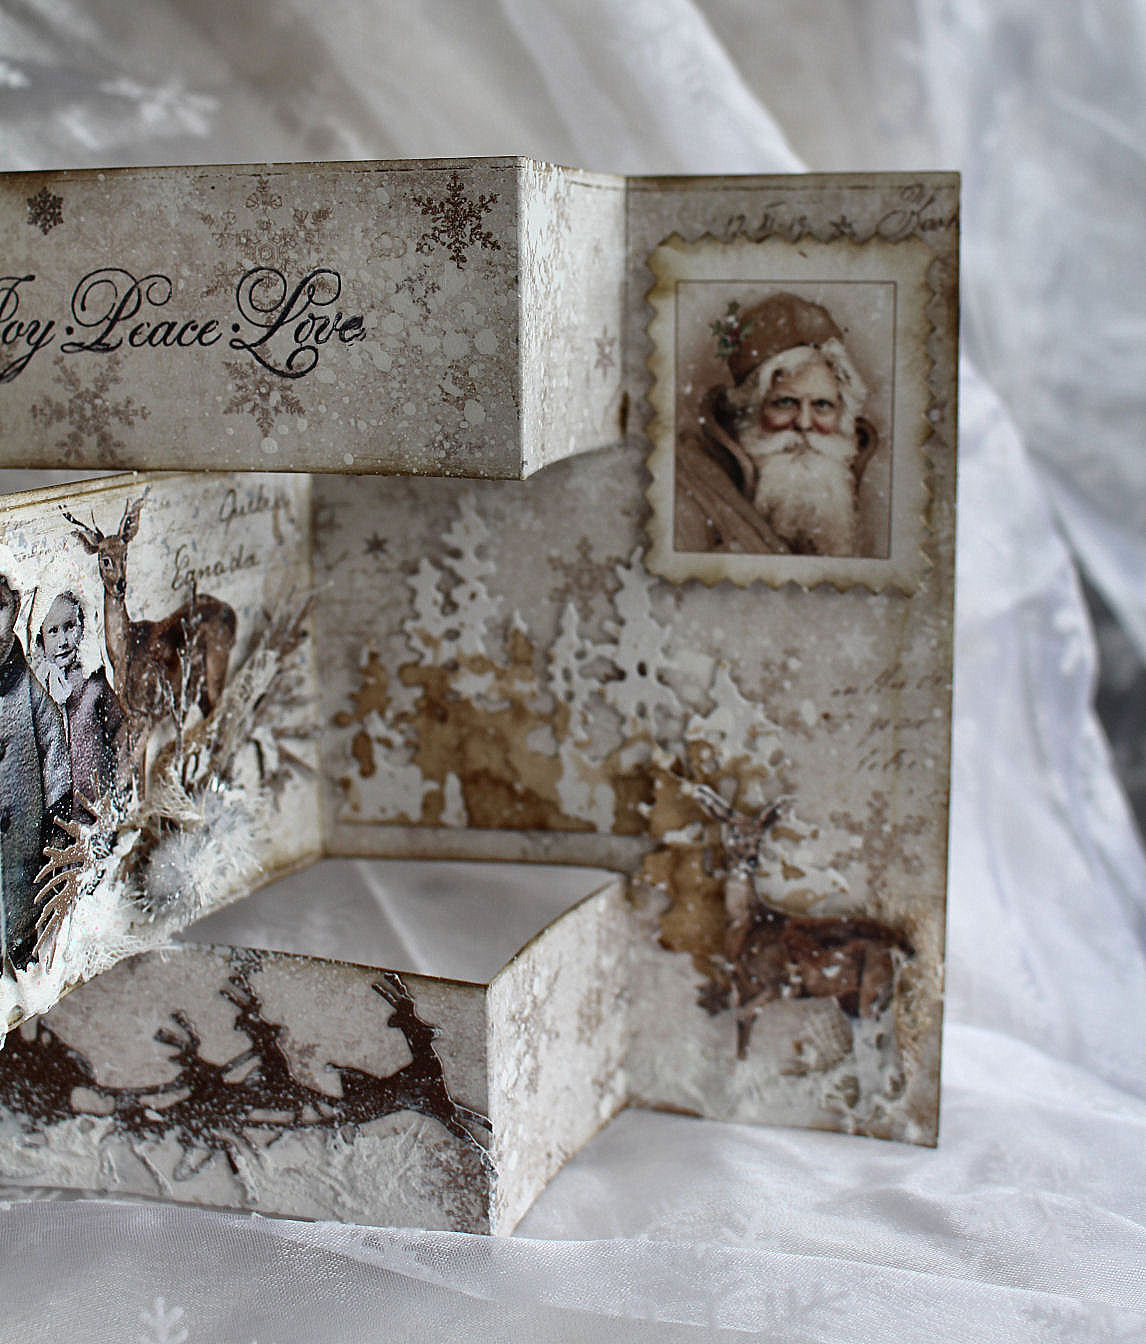
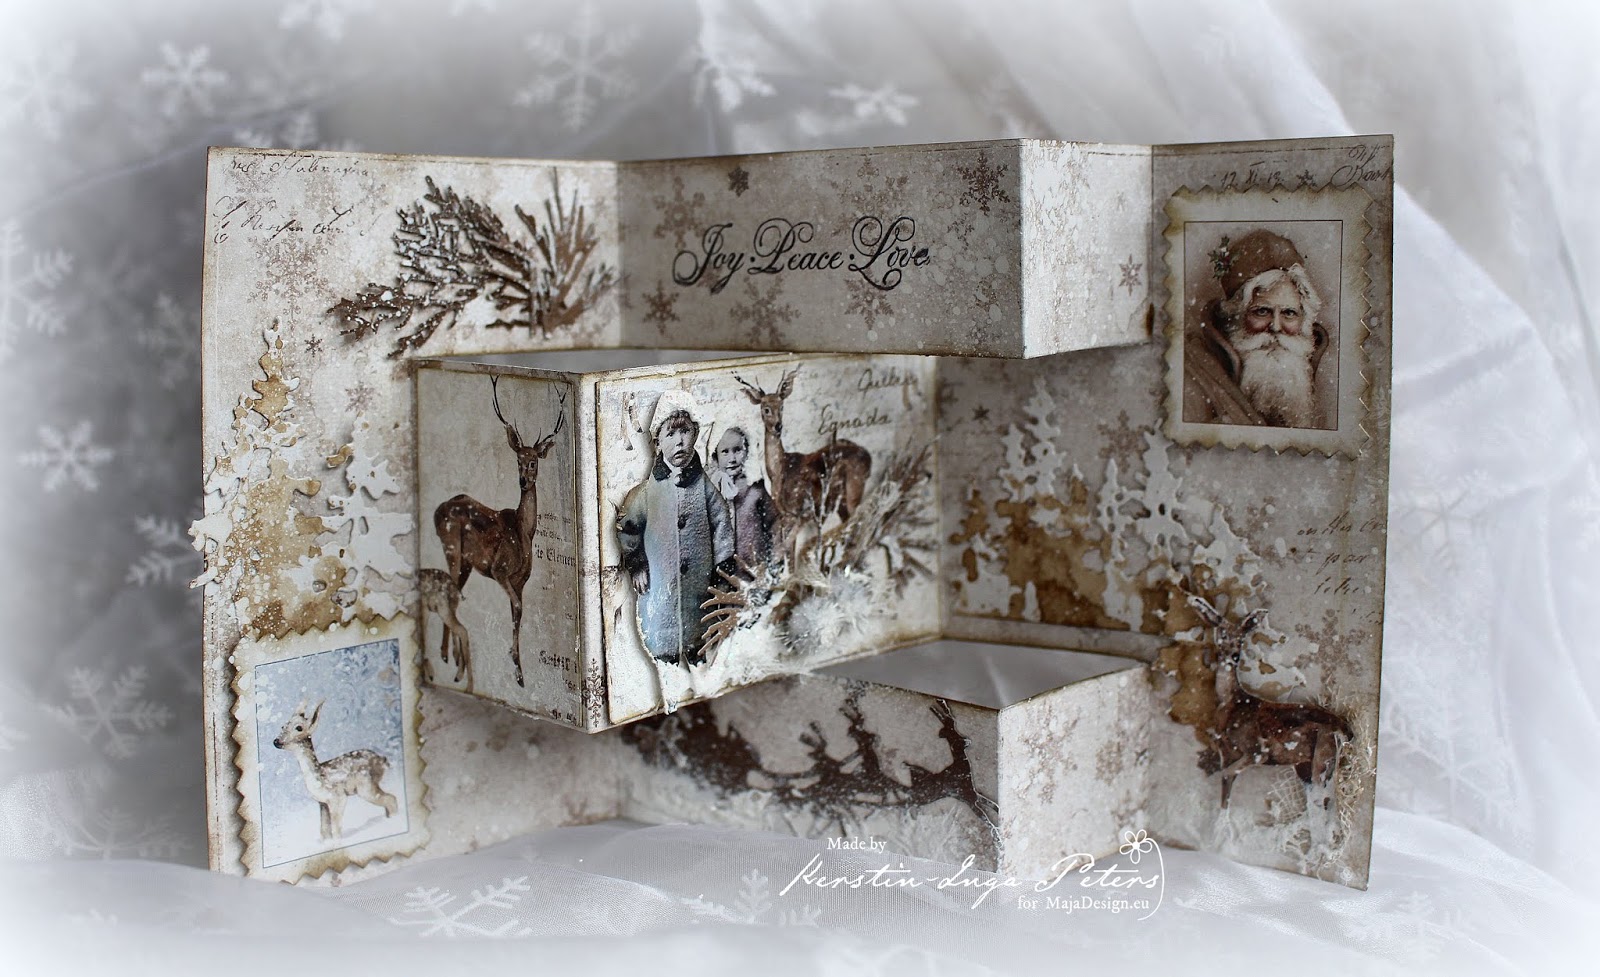
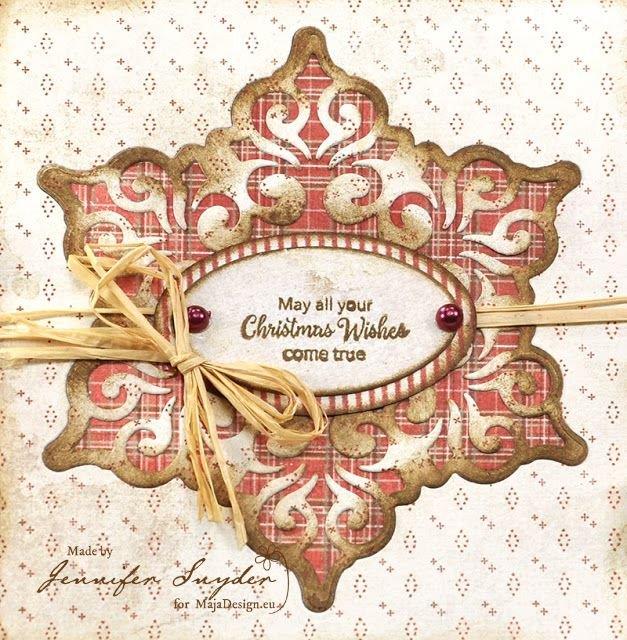
I kept the design very simple so that the shaker remains the main focus. I only added some more die-cuts and a couple of pom-poms to decorate the frame and added a stamped and embossed sentiment.

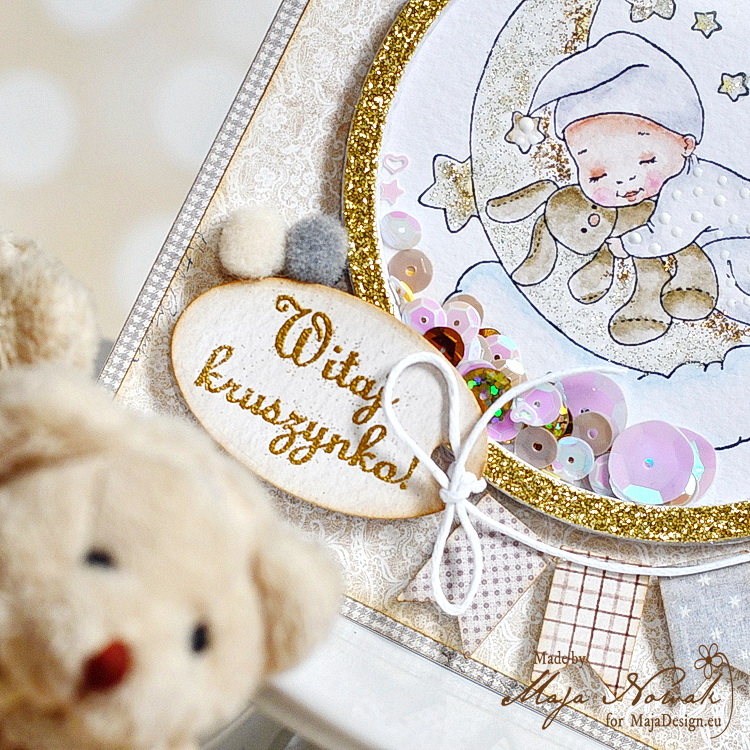
The image inside the shaker is coloured with Kuretake Twin markers. I accented the details with glitters to get an ombre effect on the moon:

It wasn’t easy, it wasn’t quick, but I still like the result. Do you? 🙂

The list of supplies:
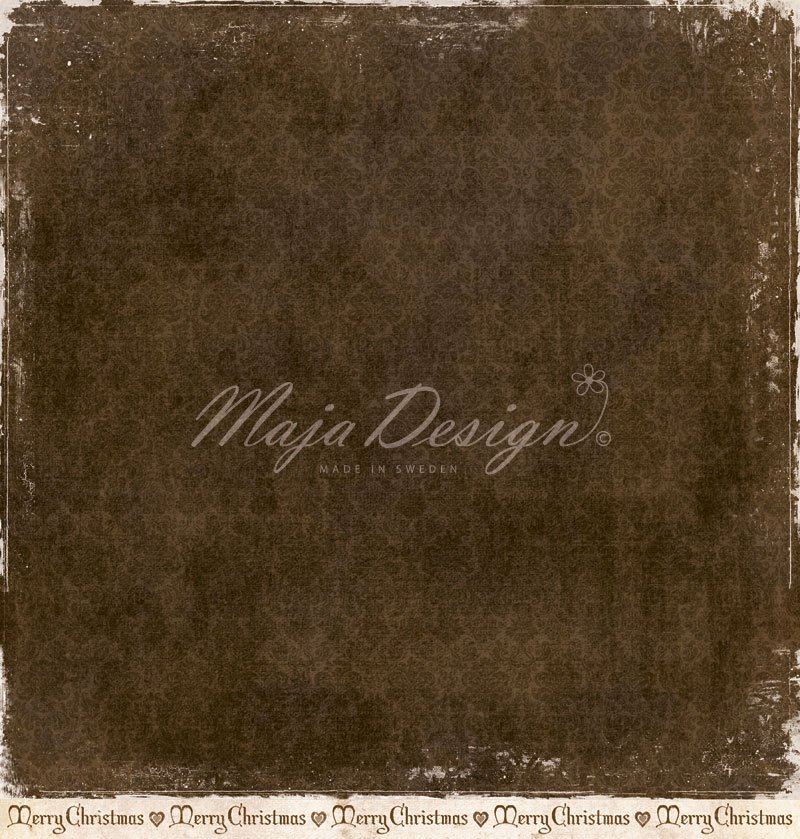
Maja Design papers:

Other: stamps: Whimsy Stamps, Lemonade; dies: CreaLies, ScrapMan; pom-poms, glitter cardstock: my stash.

Do you make shaker box projects?

That’s all for today, thank you for visiting and drop by tomorrow!

Christmas in September

1

Posted by Jennifer Snyder

9 September, 2019 -

Write a comment
Jennifer Snyder here with Christmas in September.  I know summer has just faded and I promise I am not trying to rush the holidays.
I created a classic card that is simple but graceful – with a touch of rustic.
The collection used is an older collection,  Maja Design – I Wish Collection
and more specifically, I used the front and back of the same sheet, “I Wish Christmas Was Today”.
I really love the red plaid paper in this collection.  It’s rustic, vintage and totally gets me in the Christmas in September feeling.
I added a die with lightly inked edges and tied together with raffia for more old country feel.
Super easy.  Christmas cards do not need to be complex and complicated.  I find when I plan on making my holiday cards super complicated with a lot of embellishments, I never finish the cards.
The best card is the card that gets mailed.


Thanks for stopping.  Remember – it’s never too early to start those holiday cards!

Live With Passion Layout with Video Tutorial

1

Posted by Mary Tzalla

26 April, 2019 - , ,

Write a comment

Hello Maja fans!

Today, I would like to share a new layout with a video tutorial made for my April inspiration. To create my page I used Maja Design papers from the gorgeous I Wish” collection along with several gorgeous Dusty Attic chipboards and beautiful 49 and Market flowers.

As always I found my photo on Pinterest and this one inspired me to create a steampunk page with a romantic and mysterious feeling. But, before I continue more I want to give all the proper credits to the ”unknown” photographer.


You can watch all the procedure here…


For my project, I chose the ”I Wish – those memories will last” paper from the ”I Wish” collection. To start, I applied a coat of clear gesso and then, I created texture with a Finnabair icing paste and a stencil. Then, I randomly stamped and used Lindy’s Gang sprays to add color.

Next, I used different mixed media techniques to treat the Dusty Attic chipboards which you can watch on the video tutorial.

Then, I layered all the gorgeous elements around my photo and added in some 49 and Market flowers from the ”Botanical Blends & Potpourri – Marina” sets.


Paper used:


I hope you enjoyed my project!

Until next time happy crafting!


Captured Layout with Video Tutorial

1

Posted by Mary Tzalla

26 March, 2019 - , ,

Write a comment

Hello dear friends!

Mary with you today and I have a new layout with a video tutorial to share with you. To create my page I used papers from the gorgeous ”I Wish” collection along with some beautiful Dusty Attic chipboards which was placed around a photo I found on Pinterest. But, before I continue more I want to give all the proper credits to the ”unknown” photographer.


You can watch all the procedure here…

And here are some close ups…

I used the ”I wish those memories will last” paper from the ”I Wish” collection and I made some layers behind my photo with the ”Evergreen” and the ”Outdoors” papers from the ”Joyous Winterdays” collection.

To start, I applied a coat of clear gesso on the background. Then, I created texture with graphite paste and a stencil and heat emboss the pattern with the Wow metallic Platinum Sparkle embossing powder. Made some stamping here and there and used Lindy’s Gang sprays to add color.

Next, I embossed the ”Chain Circles” & the ”Ornate Corner #13” chipboard pieces with the Aged Ivory Stampendous embossing powder.
Continued with the ”Foliage #8” & ”Foliage #9” chippies which were painted with the Finnabair Golden Moss acrylic paint. The ”Window & Shutters #2” and the ”Wordpl@y3” pieces were also painted with the Finnabair Rustic Brown paint.

When everything was glued down I added some art stones and glass beads. The final touch was made with some splatters with white acrylic ink.

Paper used:

I hope you enjoyed my project!

Thank you for stopping by!